How to Pack a Home Office: Computers, Monitors, and Cables
Plan your office boxes, protect computers and screens, and keep labeled cables and a first-day work kit within reach.
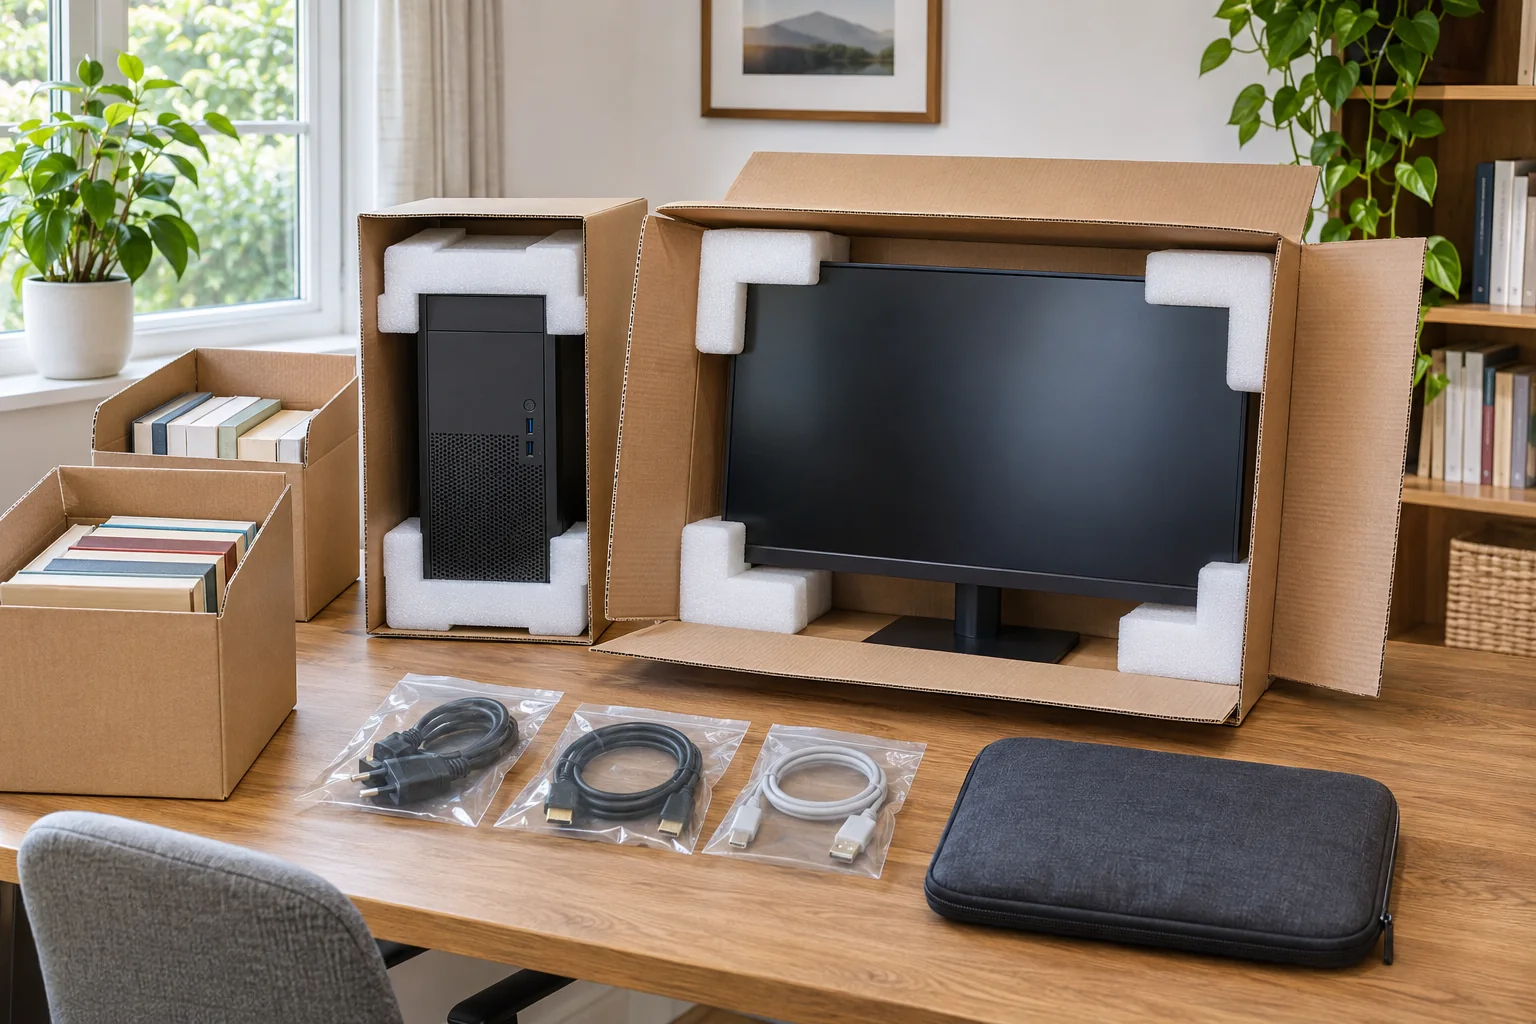
A home office can fit into a corner of a room and still contain the equipment you depend on for your income. A cracked monitor or a missing dock power adapter can delay your first workday.
To pack a home office, back up your files, photograph connections, and pack each device with its own accessories and suitable protection. These six steps cover supplies, computers, monitors, printers, and furniture, with a small work kit that stays accessible through moving day.
Step 1: Estimate boxes and supplies for a home office
Count your screens, computers, books, and files before buying cartons. Electronics need boxes sized for their protective packaging; books need cartons you can lift without straining. A printer or tower may need its own carton in addition to the screen boxes below.
Use these illustrative shopping allowances for the example setups. Start at the lower end for a lightly stocked desk and adjust after packing your first shelf.
| Office setup | Small cartons | Medium cartons | Specialty cartons | Other supplies |
|---|---|---|---|---|
| Compact: laptop, one monitor, basic stationery | 2 to 3 | 1 to 2 | One fitted monitor carton | Soft screen cover, cushioning, resealable accessory bags |
| Standard WFH: desktop, two monitors, printer, some books | 4 to 6 | 3 to 4 | One carton per screen; separate tower and printer cartons as needed | Static-shielding bag if removing components, suitable cushioning, tape, reusable cable ties |
| Full studio: several devices, archives, bookshelves | 8 to 12 | 5 to 7 | One carton per screen, device cartons, and file cartons | Packing paper, labeled hardware bags, furniture blankets, stretch wrap |
Carton labels vary by supplier. A 1.5 cu ft small box and a 3 cu ft medium box are common retail descriptions, but BoxCount's calculator uses its own labeled sizes. Check actual dimensions before comparing your shopping list. Use smaller book cartons when a small box would still become too heavy, and count file cartons separately so you do not buy them twice.
Use the BoxCount Planner moving box calculator to build your household supply estimate, including books and fragile belongings. Then check the office against your inventory. The calculator cannot measure your monitor or guarantee a custom electronics-box count.
For a monitor carton, compare packed width, height, depth, and load rating, not only the advertised screen diagonal. Reusable cable ties and writable tape help organize connections. Ordinary resealable bags are useful for screws and cables; exposed circuit boards need suitable ESD packaging.
Step 2: Back up data and map your cable setup first
Back up your drives before unplugging
Complete a backup to your normal cloud service or an external drive before shutting down the computer. Check that the backup finished and open a few important files from it. Check while the old office is still connected, when you can recover a missing folder.
Keep the external drive with your laptop and essential documents. Make sure you can access your account recovery information and security keys during the move. If this is employer-owned equipment, follow your employer's transport and data-handling rules before moving it.
Shut down the computer fully, switch off peripherals, and disconnect power before packing. Leave yourself a working laptop and charger if you need to keep working while the desktop is in transit.
Use the photo and cable-label method
Take a clear photo of the back of the computer, each monitor, the dock, and the router before removing a cable. Include the port labels when possible. The same-looking connector may serve a different function on another device.
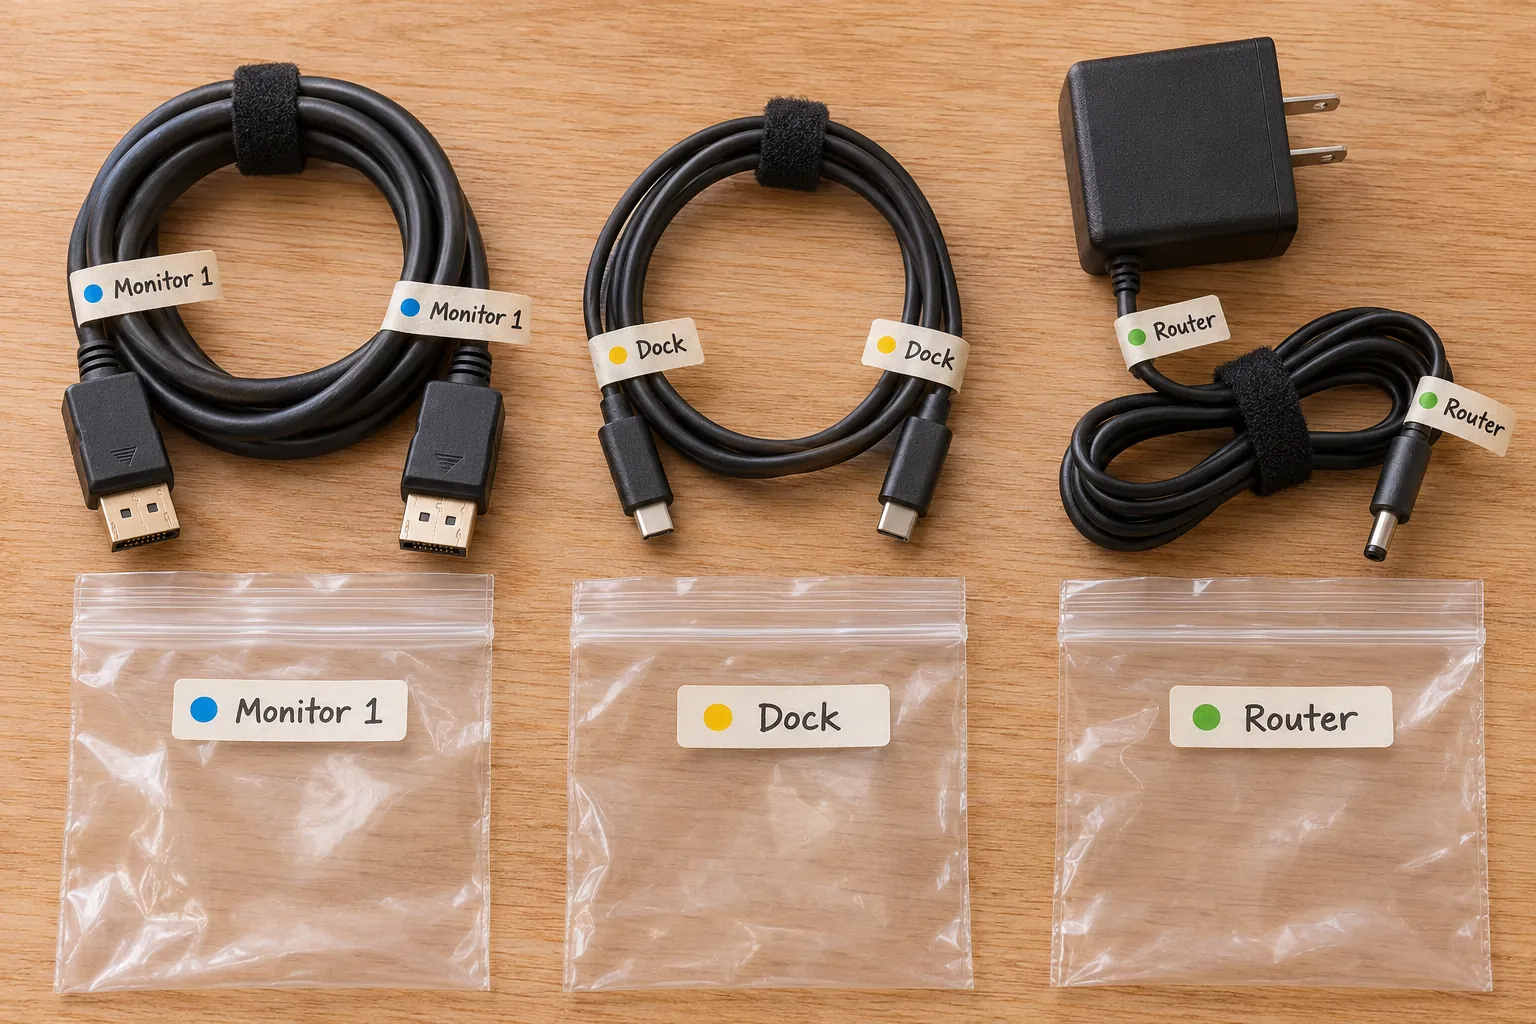
- Label both ends with the device and connection: "Monitor 1: DisplayPort to PC" or "Dock: power adapter."
- Add a matching color to the label and port reference if that helps, but keep the written description.
- Coil cables loosely and secure them with reusable ties. Avoid sharp bends at the connectors.
- Put each device's cables and screws in a labeled accessory bag. Keep heavy power adapters separately cushioned.
Place these bags in one accessible carton marked "OFFICE CABLES: OPEN FIRST." If an accessory travels with its device, isolate it in the accessory compartment or a separate padded package so it cannot strike the screen. Keep your laptop charger in your personal work kit.
Step 3: How to pack computer monitors, including curved screens
Remove stands and mounting arms
Check the manual before releasing a stand or VESA mount. Support the monitor by its casing as directed, and ask for help with a wide or heavy screen. Keep fingers and tools away from the display surface.
Wrap the base and mounting arm separately. Label the screw bag with the monitor number and keep it with the stand package. Use the support position specified in the manual; a curved display should not bear weight on its face while you remove the stand.
Protect a screen without the original box
The original carton with its fitted inserts is the best starting point when it is intact. Without it, choose a monitor packing kit that supports the casing and corners and leaves space for cushioning. The TV packing guide explains the same box-fit and separate-accessory checks for larger screens.
Cover the display with a clean, soft, non-abrasive sleeve or foam sheet suitable for the panel. Cushion the outside and protect the corners according to the packing kit's instructions. Keep tape off the display and finished surfaces. Any rigid screen guard must be supported by the packing system so it cannot press into the panel.
Add cushioning until the protected monitor stays stable without squeezing it. A fixed rule such as "three layers of bubble wrap" cannot account for every screen, wrap thickness, or box. Our bubble wrap planning guide helps estimate material, but does not replace the device's packing instructions.
Give curved and ultrawide monitors shaped support
A curved screen needs support that follows the monitor's shape without loading the display. Do not push crumpled paper into the front curve or pull a flat board tightly across it. Use the original molded inserts, a compatible replacement system, or a professional packer when you cannot support it properly.
KTC's curved-monitor transport guidance describes the risks of screen pressure, twisting, and loose accessories. Keep the boxed monitor stable, follow its specified orientation, and prevent other cargo from pressing on it. A loose monitor on a car seat still needs suitable protection and restraint.
Step 4: Pack a desktop PC tower and printer
Secure heavy internal components using the maker's method
A large graphics card or heavy air cooler needs a transport plan before the tower enters the moving load. Start with the computer builder's instructions. You may need a supplied internal support, component removal, or help from a technician.
The instructions differ by system. XMG requires separate GPU packing for its desktop RMA shipments. Corsair's Vengeance return instructions use a supplied GPU foam insert. These are examples of manufacturer-specific methods, not interchangeable instructions for every PC.
If the maker recommends removing a component, follow its service procedure and ESD precautions, or have a technician do it. Pack the removed graphics card in suitable static-shielding packaging, then cushion it inside a rigid carton. Protect its connectors and fans from pressure. An ordinary kitchen bag is not suitable packaging for a bare graphics card.
Pink antistatic bubble wrap can provide cushioning when its specifications fit the job. Color alone does not establish protection, and antistatic polyethylene is not a substitute for static shielding. Botron describes pink polyethylene as an added layer around appropriately shielded components.
Do not stuff newspaper, loose bubble wrap, or generic expanding foam among the motherboard components. Use only the builder's specified internal protection, and mark it for removal before startup. Close the case, protect any glass panel from outside pressure, and use fitted external cushioning in a strong box. Keep the tower and heavy accessories from moving against one another.
Prepare inkjet and laser printers by model
Look up the printer's transport instructions before touching the ink or toner. There is no universal rule to remove every cartridge. For example, Epson's SureColor P400 instructions say to leave ink cartridges installed, because removal can dry the print head.
Laser printers and tank printers can have different instructions for toner assemblies, transport locks, caps, or valves. Remove and bag a cartridge only when the manual calls for it, using its specified protective packaging. Keep the printer in its required orientation; a sealed outer bag does not make tipping safe.
Remove paper, close or detach trays as directed, and secure the scanner lid using the approved transport method. Avoid tape over controls or fragile finishes. Use the original inserts or equivalent protection around the machine, with no load on its control panel. Keep a note of every transport lock and tape strip to remove before printing.
Step 5: Pack books, files, and sensitive documents
Put books and reference binders in small boxes
Pack books, paper reams, and binders in small, sturdy cartons. Lift the first carton before filling the next one. Stop before the weight becomes awkward, even if space remains, and cushion gaps so the contents stay supported. The book packing guide covers upright rows and flat stacks.
File cartons with lids and handles can make folders easier to access, but check their load rating and secure the lid for transit. Keep your folder order, label the destination drawer, and put a broad contents description on the outside. A label such as "Office: archive 2 of 3" identifies the box without listing private information.
Carry sensitive records and work essentials yourself
Keep passports, tax records, contracts, backup drives, and security keys under your personal control. A lockable document case can help organize them, but it still needs to stay with you. Separate these from routine office archives before anyone starts loading the truck.
Build a work kit with your laptop, its charger, a mouse if needed, and the information required to sign in and reach your internet provider. Add the kit to your moving-day essentials checklist. Put the office cable carton where it can be unloaded early, and keep irreplaceable records out of it.
Step 6: Disassemble the desk and protect the chair
Prepare standing desks and standard desks
Clear the desktop, photograph the underside, and check the desk's moving instructions. For an electric standing desk, use the recommended transport position before unplugging it. Label the controller and motor connections as you disconnect them, and secure the cables to the frame without pulling on connectors.
Remove the desktop or legs when the manufacturer recommends disassembly or the assembled desk cannot pass through the route safely. Bag the hardware by assembly, including washers and brackets. Place the bag with the wrapped desk parts where it will remain easy to find.
Protect the desktop and corners with clean moving blankets. Use stretch wrap to hold padding in place, keeping adhesive off the finish. Carry the desk by its structural parts and arrange help for heavy tops. The furniture protection guide covers padding and route checks.
Protect the office chair
If the chair fits through the route assembled, cover the upholstery or mesh and cushion exposed arms and the base. Keep it from rolling during loading and transit. Remove detachable parts only as the manual directs, and avoid forcing the gas-lift cylinder apart. Move the chair as its own item instead of balancing its wheels on packed cartons.
Reconnect in a useful order
Set up one working station before unpacking every archive box. Use the photos and device labels to match the original connections, and keep the packing material until the equipment checks are complete.
- Assemble the desk and chair, then check stability.
- Inspect equipment and cables for transport damage. Remove every internal shipping insert, transport lock, and tape strip required by the manuals before powering on.
- Let equipment reach the indoor conditions specified by its maker, and keep it disconnected if moisture is present.
- Connect the router, computer, and one monitor using the correct power adapters.
- Test internet access, work sign-in, audio, and an important file before adding the second screen and printer.
Before buying your remaining supplies, measure the equipment cartons and count the packed book boxes. Update your moving supplies estimate with what the office actually uses, and reserve the labeled work kit for your first day.
Use the calculator for a personalized starting estimate. Exact needs vary, so adjust it after you take inventory.
Use the moving supplies calculator